Friday, February 21, 2014

Trials of a Prop Builder & Costume Maker?

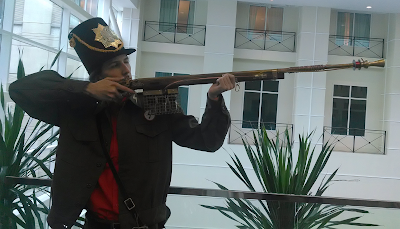
I went to Katsucon 2014 last weekend, continuing on a tradition I've held since I was 15. I decided to break out a costume idea that I've had in the back of my mind for some time now: a soldier inspired by the Girl Genius comic. Last year, I did something similar, but more desert themed. The makeshift rucksack I threw together proved to be far too uncomfortable to wear for more than an hour, and it did a real number on my back. This year I ditched the backpack in exchange for a sling that was both functional and decorative (my lunch was in the containers).

On top of that, I changed the color scheme to be more olive drab, have a bright red undershirt (for maximum Napoleonic uniform stylings), and add a new hat.

Instead of a pith helmet for a desert environment, I went with a felt shako that I fashioned out of a cheap costume top hat and some leather scrap. The hardest part to get for it was the plate, and I ended up going with a reproduction 1833 US Dragoon's plate in brass complete with the federal eagle. The cord was hand-made, as were the epaulettes on my shoulders.

I found 3 different kinds of patches, each with some stylized lightning bolt(s) to affix onto my jacket. 2 simple yellows ones on my collar, a red-outlined arrow-bolt above my left pocket, and 2 silver and gold stars with arrow-bolts going off in different directions.


The best part of the whole outfit is my prop ray gun.  This is the second variation of it, a significant improvement over the first.  I tend to refer to it as an Æther Rifle, but that is more of a term I use for the first variation which was significantly more simple.  I have yet to give this version a proper name, but I'm sure I will eventually.  This one has taken on a more teslapunk aesthetic, adding in a lot more wires, coils, and cables. The vacuum tubes in front of the trigger guard were re-arranged, and replacements were selected based on improved look and imagined purpose.  The 3 octal tubes pictured here are a Triode/dual Diode, a full wave rectifier (2 Diodes), and a zero-potential grid Pentode.

Don't eat my chicken wing!


The complex thing on the end of the barrel took weeks to gather parts for, and only about 2 days to assemble.  The brass thing is a little vase I got for 80 cents, and the spool with the red wire is made out of lamp parts.  Magnet wire is a pain to wrap, lemme tell you.  The yellow cord running from the end of the barrel to the beginning of the valve is from an old lamp (scored it for free from a lamp repair shop). I even threw on a crude sight at the front... just a screw with some wire wrapped around it.

Anyway, this is what I wore on Saturday of the convention. If you have any pictures of me, feel free to pass them along or leave a link. I would greatly appreciate it.
Monday, October 28, 2013

Machine Headcount:

These are the machines at my disposal.  The earliest has been in my possession since 2003.

Oldest processor is a 386SX, newest is AMD Phenom II x4
OS Year Serial Can be Networked Optical 3½ Floppy USB Notes
Windows 7 Pro 2010 Yes Yes Dual DVD Not Reliable Yes Warm
Windows XP Pro 2003 No Yes DVD No Yes Workhorse
Windows XP Pro 2004 Yes Yes DVD Semi-Reliable Yes Slower than its laptop contemporary
None 2005 Yes Probably No Yes Yes Missing parts; similar to above
Linux: openSuSE 11.3 2008 Yes Yes DVD No Yes Robust
Linux: Mint 12 & Windows 7 Pro 2008? Yes Probably DVD No Yes OS too new for it
Windows 2000 Pro 2000 Yes Yes CD Yes Yes Kinda slow, but impressive
Windows 98 1999 Yes Probably not DVD Broken USB1.0 only Used to be networked
Windows 98 1997? Yes Probably not CD No No Tiny HDD, sound driver issues
Windows 95C 1998? Yes Filesharing only Dual CD Yes No Also has 5¼ floppy
Windows 3.11 1994 Yes Probably not No No No Floppy drive cable shredded
DOS 6.22 1994 I think BNC only No Yes No SCSI compatible

Tuesday, January 10, 2012

Trials of a Model Builder Part IV

After that light-up MS-06FZ was completed, it was time to tackle another federation mobile suit like my second kit.  But instead of a Mass Production Guncannon, I had a cheaply made Gundam Ground-Type up for building.  Rather than attempting to battle-scar it or anything like that, I gave it my first ever attempt at painting it completely to accentuate the existing color scheme.

Being a very unskilled hand brushing student, it took a few coats in certain detail areas to achieve the proper patterns.  The most detailed sections were all wrong, and there was plenty of boundaries crossed by brush that were reminiscent of a child with a coloring book and no regard for the lines.  It too was a flimsy kit, just like the first one, and quite a few parts almost disintegrated under the paint thinner used to attempt reversing my mistakes.  Namely, the head underwent several coloration revisions, and took the most wear from the petroleum distillates that dissolved Testors enamel, to the point where it actually fell apart.

The finished kit felt like a step backwards when compared to the last two models, so once again turned my attention toward a Zaku II. 

This time, it was a brand new, higher quality version of the first kit I had tried, with more detail and better base material used. Upon seeing it for the first time, I realized that the color was not to my liking at all.  With that, I got to work to attempt completely painting a kit from top to bottom, this time with my own color scheme.  I forgo-ed the battle damage once again, and opted to add other detail features to this one, like my own insignia.  It took some time assembling and painting it, but the finished kit looked pretty good for an attempt at something new for me.  I gave the left side of the chest an inverted yellow kite, and the right received a yellow bar.  The left side of the head above one of the eye ports was adorned with yellow triangle as well.  All three pieces of insignia were added with the assistance of masking tape to counteract my rather unsteady hand.

The finished kit was one of my best by far, with plenty of detail where it was needed, and an overall good coloration.  The critique that I received from my model building counterpart was that Zakus didn't come in that color, and it was a non-canonical paint scheme that I was using, but it was my kit and I could do as I pleased.  I didn't care, it was my kit, with my custom scheme, so it was going to look the way I had dictated.

It would be the final kit of my freshman year of college, and the last of my hand painted work.  My parents didn't seem to care much about what I had built.  The total kits completed in this time span were as follows (in order built):
MS-06F Zaku II (MSG: The 08th MS Team)
RX-77D Guncannon Mass Production (MSG 0080: War in the Pocket)
MS-06FZ Zaku II Kai (MSG 0080: War in the Pocket)
RX-79G Gundam Ground Type (MSG: The 08th MS Team)
MS-06(?) Zaku II (MSG Generic)

Sunday, July 31, 2011

Trials of a Model Builder Part III

My best friend's reaction wasn't what I was expecting.  His model kits looked clean, for straight kit builds with no detail.  They were simple and plain, but nice nonetheless.  He had assembled his right off the bat, with no aftermarket changes made.  Mine looked like somebody had ruined it, and it was no longer a worthy weapon of war.  It was more akin to a poor action figure that had been stepped on and abused, not a battle-hardened weapon of war.

My next model kit was just like the last one, in that I felt compelled to paint it up like it had been through a tough fight.  However, I did so with much more care and detail than the first.  The artificial blast marks looked more realistic (for a piece of plastic); the parts stayed together much more readily, due to the higher quality of the kit.  Every thing that I had done on the first one that made it a horrible abomination somehow made this second one an excellent model.  I couldn't put my finger on it, but I figured I would try yet again with this upcoming third model. 

My friends were impressed briefly by the new model, but quickly their attention would move on.  The  third model kit construction began, and I spent a good deal of time constructing, the minor details of the kit were on my mind once again.  Every last inch of the thing was adorned with the wounds of the battlefield, but this was not the greatest attraction of the kit by far.  No, the main thing that I had been toiling away at was adding lighting to the mono-eye of the Zaku II FZ that lay before me.

When you find yourself at college, drilling a hole can be a daunting task.  And so I tackled it as best as I could: by spinning my screwdrivers in place as fast as I could, so as to slowly whittle away little shavings of plastic.  Millimeter by millimeter.  Speck by speck.  It took hours upon hours to completely drill through the little head section that was smaller than my finger tip, but it happened.  My hands hurt afterword, but it was worth it.  A tiny little LED was permanently encased in the tiny little Zaku head, and the leads were fed down the neck of the kit, into the backpack of the beast.  Hollowing out the backpack took a fraction of the effort, and soon it was full again, but this time with a button battery.

The worn look was applied to this one just as it was to predecessors.  But that light-up mono-eye was what made it a fantastic model.  And damn it, it was a step in the right direction.

Trials of a Model Builder Part II

The Porsche kit got painted a bright yellow, with black details, and ended up disappearing sometime shortly after that.  I don't know what became of it, nor do I care- it looked terrible.  I mean, it was a fine model kit, and I had done an alright job with my dad's help.  But I still didn't like it, since I don't really have an interest in cars.

My dad ended up getting a really high-end detailed model kit of the Apollo Command Module and Service Module.  He wanted me to help him build it, and so I did.  It was a relatively complicated kit, designed for those who had the skill required to address the nuances of the structure, and apply color exactly where it needed to be, and nowhere else.  We spent what felt like weeks painting, prepping, trimming, gluing, adjusting, etc., to produce a kit worthy of display.  I thought that the colors for certain interior components looked all wrong, but supposedly they were right on the mark.

We displayed it prominently on top of the TV's cabinet, a good 7 feet off the ground.  While sitting watching some show not worthy of remembrance, whilst my mom sat adjacent to me reading her newspaper, the model kit tumbled down from its perch, only to smash into pieces upon contacting the carpeted floor below.  My dad was sad to see that kit destroyed, and no doubt thought that I was responsible for knocking down from its pedestal up on high.  It wasn't even salvaged- it ended up square in the trash.

 Model kits were cast from my mind for close to a decade after that.  It wouldn't be until my college-era best friend introduced me to the world of Mobile Suit Gundam that I would begin building models again.

We started with 0080: War in the Pocket, followed closely by 08th MS Team, and 0083: Stardust Memory.  I  wasn't interested at first, thinking it was the same as Gundam Wing, a childish work that only seemed to keep the attention of my friends who had nostalgia goggles for it harkening back to their childhoods.  Something fantastic about the series caught my eye, and I purchased a pair of starter kits with my friend to get us off of the ground, and get my footing again in this medium.

I bought a set of small detail paints, found an x-acto knife, and found a place to mount my pocket vice on my desk.  The first kit I pumped out was a thrill to assemble, as I covered it with paint and a few stickers.  I tried to detail it as best I could, giving it crude battle damage, cutting away sections, scraping divots into the plastic, and splashing color in places to make it appear combat scarred.  It looked alright to me, but the poor quality of the kit, and the material with which it was molded made it flimsy, and hard to keep in one piece.

I was off to show it my friend for his critique of my work.

Trials of a Model Builder Part I

Long ago, in grade school, I was introduced to the concept of building model kits.  I remember watching my dad build a scale model of the space shuttle when I was about 5 or 6, using an airbrush to detail the work.  It was a glorious rendering of the shuttle, something that I would never expect to be able to duplicate in my lifetime.  The smell of the paint thinner, the must of the carcinogenic clue, the odor of the white model putty- it all culminated in a strong concoction that made the basement a borderline health hazard.

Fast forward to the late 90's, and my cub-scout troop is instructed to have each member bring a model kit of their choice to the next meeting.  My dad let me pick out a kit, and I selected a convertible sports car, possibly a Porsche, but lost in my collective memory.  I brought it to the scout house, opened up the box, studied the directions, surveyed the parts that were arranged before me and awaited instruction.  My dad told me to break apart the pieces (all of them, since it was a small enough kit not to get parts mixed up), and begin removing the traces of where they had been affixed to the plastic frame.

I snapped them off, sometimes aided by an x-acto knife, but always followed up with a good several minutes of sanding to strike any trace of the frame from the piece.  I would periodically look up to see my good friend accross the table snapping pieces off of the molding racks, only to quickly push them together with glue. He didn't seem too concerned that a nub adorned the section he had just assembled, and I was baffled at this observation.

I walked out of the scout house with a box filled with freshly sanded and prepared pieces, and one or two simple parts that could be glued, awaiting the first coats of spray paint.  My friend across the table, like so many other scouts there that night, walked away with a fully completed model kit, with no paint on it whatsoever.  No paint, no detailing save for a few stickers, nothing but what came in the box (and an excess of model glue) used to cobble together the model kits in tow.

Commodore Z's Mindhouse Boilerplate

The world of a geek is complicated, and even though I'm the farthest thing from a writer or anything remotely close, sometimes there are pieces of my geeky mind that need to be expressed.

With that, if you happen to be reading this for some reason (I can't rightly think of a good one yet), then maybe you can get a glimpse into the inner working of my mind.  Perhaps I'll talk about a project that's currently occupying me, or some fragment from a topic that amuses me.  Take what I say with a grain of salt, or perhaps some onion powder.